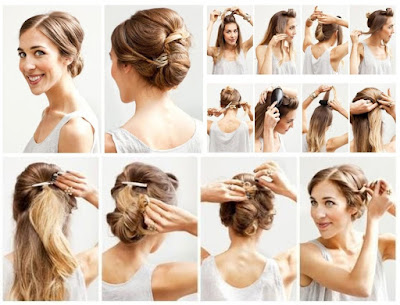
Hey, everyone today I'm here and we are going to show you How To Do An Updo Type Hairstyle Now, I've tried this one in the past and haven't filmed it because I didn't really love the way it turned out, but I figured out a trick that's going to make all the difference. So let's get started. We have begun by just pulling her hair into a high ponytail, and I have my little donut shaped bun maker that we're going to use today, that matches her hair color as close as we can. Now before I begin, what I'm going to do is just lift up her ponytail, I'm going to take a little piece of hair, and leave it out from the rest of the hair.
And now I'm going to take the bun maker, and go ahead and slide it up over the rest of her hair, and down into place. And like any normal bun maker, you're just going to let her hair fall over, and make sure it's as evenly spaced as possible around that bun. You can kind of feel and make sure that you have hair equally all over it. I'm just going to take a comb, and just very lightly comb those edges just to keep the flyways down and under control, and make sure I like the way it's going to look when it's finished. Now we're going to kind of part her hair, and we're going to find that little piece we left out,and we're going to actually begin the braid right here.
So we're going to divide it into three sections, and I'm going to be doing a Dutch braid. And then, of course, using the lace portion of it, I'm only going to be adding hair into the top section of the bun so the top piece of the bun. Make sure we don't pick any of that up. So I've added hair only to the top piece as I'm braiding. Here we go. And right here in front, I'm just going to try to make sure I leave that a little bit loose, only because we're going to end up talking hair underneath it, and it needs to not be too tight. We're going to just continue on adding hair piece by piece, and trying to keep the braid, as best as we can, placed right at the base of the bun maker.
OK, now when you get to the end, and you've added in your last piece of hair, we're just going to go ahead and continue braiding it down the remainder of the hair. Now you're getting to the end, so you're going to have little pieces pop out here and there, and that's OK. Keep going as far down as we can. And then we are going to secure it with an elastic. I think we're just about there. So pick up an elastic and secure it. Now we're going to take the remainder of the braid and tuck it under the first part. So we're just going kind of lift that up, and tuck the braid underneath.We'll fix that in a minute with some bobby pins. And when you get it kind of situated, go ahead and secure it with bobby pins.
Let's hide that part up there a little bit more. Secure it with a bobby pin. And I definitely don't want that out. Now right here, I'm going to try my best to just pull that edge over together, and bobby pin it so that it just looks like one continuous braid all the way around. You can add any bobby pins anywhere you still feel like it might be poking up, or might be flying away. And then you can go back and just give these a little tug if you're seeing some of your bun maker pop through. And we're all finished. And there we have the completed lace braided bun. I love the way it turned out How To Do An Updo Type Hairstyle Medium Length Hair.
