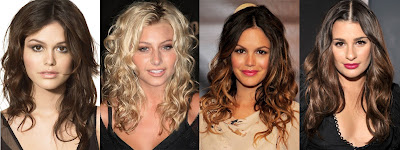
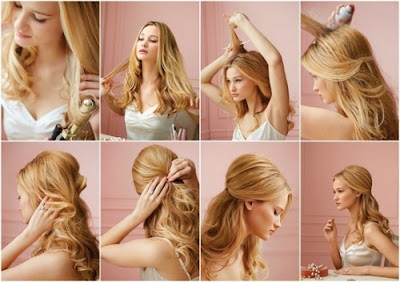
How To Do An Updo Type Hairstyle Medium Length Hair

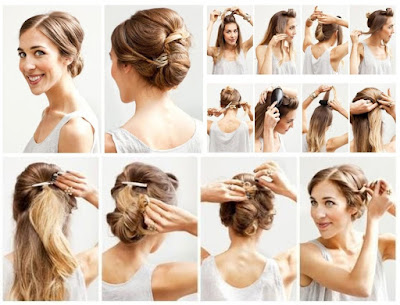
Hey, everyone today I'm here and we are going to show you How To Do An Updo Type Hairstyle Now, I've tried this one in the past and haven't filmed it because I didn't really love the way it turned out, but I figured out a trick that's going to make all the difference. So let's get started. We have begun by just pulling her hair into a high ponytail, and I have my little donut shaped bun maker that we're going to use today, that matches her hair color as close as we can. Now before I begin, what I'm going to do is just lift up her ponytail, I'm going to take a little piece of hair, and leave it out from the rest of the hair.

And now I'm going to take the bun maker, and go ahead and slide it up over the rest of her hair, and down into place. And like any normal bun maker, you're just going to let her hair fall over, and make sure it's as evenly spaced as possible around that bun. You can kind of feel and make sure that you have hair equally all over it. I'm just going to take a comb, and just very lightly comb those edges just to keep the flyways down and under control, and make sure I like the way it's going to look when it's finished. Now we're going to kind of part her hair, and we're going to find that little piece we left out,and we're going to actually begin the braid right here.

So we're going to divide it into three sections, and I'm going to be doing a Dutch braid. And then, of course, using the lace portion of it, I'm only going to be adding hair into the top section of the bun so the top piece of the bun. Make sure we don't pick any of that up. So I've added hair only to the top piece as I'm braiding. Here we go. And right here in front, I'm just going to try to make sure I leave that a little bit loose, only because we're going to end up talking hair underneath it, and it needs to not be too tight. We're going to just continue on adding hair piece by piece, and trying to keep the braid, as best as we can, placed right at the base of the bun maker.
Updo Type Hairstyle Medium Length Hair
OK, now when you get to the end, and you've added in your last piece of hair, we're just going to go ahead and continue braiding it down the remainder of the hair. Now you're getting to the end, so you're going to have little pieces pop out here and there, and that's OK. Keep going as far down as we can. And then we are going to secure it with an elastic. I think we're just about there. So pick up an elastic and secure it. Now we're going to take the remainder of the braid and tuck it under the first part. So we're just going kind of lift that up, and tuck the braid underneath.We'll fix that in a minute with some bobby pins. And when you get it kind of situated, go ahead and secure it with bobby pins.

Let's hide that part up there a little bit more. Secure it with a bobby pin. And I definitely don't want that out. Now right here, I'm going to try my best to just pull that edge over together, and bobby pin it so that it just looks like one continuous braid all the way around. You can add any bobby pins anywhere you still feel like it might be poking up, or might be flying away. And then you can go back and just give these a little tug if you're seeing some of your bun maker pop through. And we're all finished. And there we have the completed lace braided bun. I love the way it turned out How To Do An Updo Type Hairstyle Medium Length Hair.
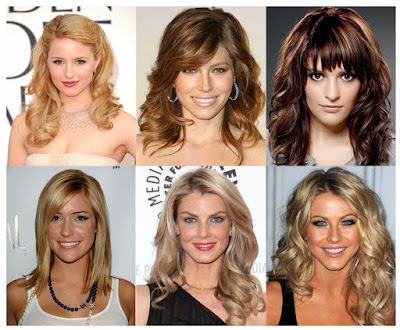
[read more..]

Hairstyles For Shoulder Length Hair For Round Faces

Hi and welcome back, So today I'm going to show you Hairstyles For Shoulder Length Hair gorgeous looks for shoulder length hair. We have one really sleek updo and then a sexy tousled half updo too. To prep the hair I just pop in a bit of mousse. I'm using a spray mousse here. It's handy to get all the sections of the hair. So just get to kind of rub it through all the layers underneath the hair as well, and this is just giving it a bit of grip and will help the curls stay a bit longer. And brush it all through to make sure you've covered all the hair. So just section off the hair, kind of working from ear to ear and pin the top half up out of the way so you can get to curling the bottom section.

I'm just going to curl random sections here just to give it a bit of movement. So kind of every second or third section just pop a curl in it. And you can go, you can curl in either direction or both directions. It doesn't have to be too uniform.  Once you've finished with the bottom sections, let the top section down and curl 2 or 3 inch sections in alternate directions. Once you've curled the whole head, or sections of it, run your fingers through breaking up the curls, and it kind of gives it just a soft, get a bit of movement in there. And for this look I'm going to pop a little bit of texturizing dust just along the crown. This kind of just helps to mess up the look a bit and give it a bit of texture and a bit of lift.

So already you can see we're getting bigger, more volume there around the sides, which is great if you have thinner hair as well, it kind of stops the need for back combing. Just to make this look a little bit special I'm going to pin up some sections towards the back of the head, just kind of giving a bit of volume, bit of a lift. It just updates the style, kind of a great day to night look. So just working towards a bit of volume at the back of the head, using curler clips the same color as your hair. There. Got a nice bit of volume there at the crown. Popping a few clips in really helps hold the style in place and will keep your hair from going flat and just gives it a kind of nice messy updo look, it doesn't have to be too polished lovely. Finish off with a bit of hairspray and you're good to go.
Hairstyles For Shoulder Length Hair
Now I'm going to show you how you can transform this look into a really sleek updo. So to transform this look we're going to take out the clips. It's great because we have the curls, we have the volume which makes the hair so much easier to work with. So to section off we're just going to keep the bangs or any longer layers that you have at the front. So put them to one side and then take another section about two inches or so wide kind of coming from the top of your ear across and pin that in place. And then this here at the top of the head, the kind of crown is going to make up the volume of our style. So it's quite textured already, we have a bit of texture just in it and it has a curl so it will be so much easier to work with.

I'm just going to back comb through the lengths just like so, working all the way up to the tip. So you're kind of looking at little troll dolls as your hair inspiration. So you want the hair to be able to stand up on it's own, hey ta da, just like that and then just keep doing that along the sides and down a bit towards the back of the head as well, and that will make up the volume for our style. Once you're happy with amount of volume that you have just roll it back. So you want to create kind of like a cushion of hair that will build up the volume. So I think that's good for us but if you want it bigger pop it up higher on the crown, if you want itlower pull it down lower, whatever you feel like. So roll it into, you kind of want kind of a croissant shape, so kind of big enough at the middle tapering down to the smaller sides.

Once you anchor the bump in place it's a lot easier to work with. You can choose you know if you want it higher or lower, bigger, so just turn it around like a fan and then pin the bits in place. Once you're happy with your shape, so you want like kind of like a fan, just like that, that's like a template of what your style is going to look like. We're going to cover this with a little bit of hairspray and then get cracking. Then take the fresh hair, give it a bit of a brush and I'm just going to back comb it ever so slightly at the root just so it's able to stand up and get up and over the style and just brush it back so you get a really sleek finish, and we're just going to pin all that in place with some curler clips.

With your remaining hair we're just going to bring it up to the anchor point working with the natural texture and the natural curl that we have so you have kind of like a messy updo at the back. Take a piece of hair, just going to roll it up just like so and then pin them in place, aiming towards the anchor point as a guide. You can pin any way you want, like if you want something a bit sleeker then go for a kind of side bun or you could even leave it down, whatever you feel like. So just keep taking same size sections and roll them up towards the tips until you have used up all the hair. Once you're happy with the back you're going to swing around to the front, and with the sections we put away at the start, take them down.

So you can see Hairstyles For Shoulder Length Hair For Round Faces they still have a bit of the natural curl to them from our earlier style, which is brilliant. We're just going to work with the curl pushing the hair kind of back towards the back of the style. There we go. We got kind of soft nice tendrils and that kind of frame the face. And then just do the exact same thing on the other side. Once you're happy finish the whole lot off with a good lot of hairspray. So there you have it guys, two super easy looks to do on shoulder length hair. If you've got any suggestions for styles you'd like to see don't forget to pop a comment in the box below and I'll see you next week.
[read more..]

Pony Hairstyles For Medium Length Hair Step By Step

Hey guys, today I'm showing you Pony Hairstyles For Medium Length Hair that you can do school or for any quick event that you need to go to. Let's start off with the first hairstyle Bring your hair into a high ponytail And secure it with as many elastic bands as you need Take a small section from underneath the ponytail And begin to wrap it around the hair tie so it's not visible Once you reach about half way down the length of your hair. Use a few bobby pins to hold the small section in place And we're done For the second hairstyle, we're going to do a similar thing.

But that section, we're going to plait it So you could use any normal plait You could just do a three stranded plait like I'm doing Or you could do a rope braid or a fishtail braid, any braid would work really well And just secure the ends with an elastic Take the braid and wrap it around the ponytail And just secure that with a few bobby pins Remove the elastic band and just blend the braid into the ponytail For the third hairstyle, we're going to pick up a chunk from the front of our face Split it into three And do a regular french braid on the top of our head If you don't know how to french braid, you can click on the link in the description.

So you just want to take sections from the crown of your head And braid it back until where you would normally place your ponytail And then just plait the rest of the hair all the way down to the bottom And secure the ends with an elastic band Gather up all your hair into a high ponytail including the braid And secure it with an elastic band And then just remove the elastic band and undo the plait and blend it into the rest of your ponytail and then, we're done  The fourth hairstyle, you want to repeat the previous steps from the previous hairstyle So just, braid the crown of your head into a french braid and then just plait it all the way down and secure the ends with an elastic band.
Pony Hairstyles For Medium Length Hair
Gather up your hair into a ponytail But this time instead of undoing the braid, we're going to wrap it around like the previous hairstyles And then pin it with a few bobby pins in place For the fifth hairstyle, we're going to do a similar hairstyle to the previous two Except we're going to do a dutch braid This is slightly easier because it's just a regular plait and you don't need to know how to french braid so just plait all the way down your hair and secure the ends with a small elastic band Gather up all your hair into a ponytail making sure that the braid is visible and then secure it with a few elastic bands remove the elastic from the braid and then just blend it in.

For the sixth Pony Hairstyles For Medium Length Hair Step By Step you want to get a topsy tail and place it in the top of your ponytail if you don't know what a topsy tail is, there will be links in the description about it then grab your ponytail and pull it through the top of your topsy tail and then pull on the end of the topsy tail to pull the hair through it seems like this hurts a lot but it really doesn't it's very gentle and you just need to ease the hair through pull the rest of the ponytail out and then just pull on it to make sure it is secure.
[read more..]

Easy Step By Step Hairstyles For Medium Length Hair

I'm going to show you Hairstyles For Medium Length Hair. First of all, I've prepped the hair by curling the hair with straightening irons and curling tongs all the way through the hair, a mixture of curls and waves to give it a more natural affect. If you like to know more how to create the curls and waves, please see the other article in this series. Okay, first of all, after you've curled and set the hair, you need to section hair to separate sections which I'll show you how to do now. You need a tail comb, the one with the long point on the end like that. We need to section hair from here to here.

We're going to take a section, about an inch, an inch and half down from the line you've divided the hair up from, all the way across, okay, and we're going to section that up and leave that out of the way. Next, you're going to take the section about three inches across, so the parting would have been in the middle. So you've now got these two sections either side of the hair. Now, what you need to do is to take this section that you've separated, keep it nice and clean. Just pull through very gently with your hand. Actually, I'm going to pull out the curl that you've created, just very gently pulling little bits of hair just with your hand and you may have to use a little bit of hairspray and a very soft bristle brush.

It's important that it's a very soft brush like this. And that just takes away any of the little hairs. You take this section, about an inch past the middle and keeping it flat to the hair and one cross another carefully making sure that you're clipping the hair just on the underneath as well as all the hair on the top. If the hair is very thick, you may need to use more than two pins just to make it very secure. So just to repeat what you've done on that side with the other side leaping over, about an inch over from the center, pin with two or three pins if you need to. Okay, now what we're going to do is take this section of hair here, probably want to split that into half, so you can see there.
Hairstyles For Medium Length Hair
Put this hair to the side at the moment; don't want to clip it out of the way. Now, what we're going to do here, just very, very gently, little bit of back combing. And back combing, start from the top and work down, all the way down, just very gently, down and just brush very, very gently. Don't want to brush all of the back combing out, just very, very gently, just smoothing over the top so you're not getting rid of all that back combing on the underneath. You'll only want to be doing a little bit of back combing, just to give it a little bit of body, just on the top and the crown. Again, take this section here, follow the same pattern.

Now, take them with two fingers, it doesn't matter which side you go from, I'm just going to pinch together like so and again make sure you've got all the hair in and tight to the scalp and up and you'd want to use at least two pins with this hair. I don't want to overcrowd it with too many pins but depending on how thick the hair is, you want it to feel quite secure that it's not going to move. And then with these last two sections here, you're just basically going to repeat the process of what you've just done. This again, is probably just even slightly less back combing - we're going to go with a slightly raised section from the front to the back just to kind of give that nice angle lift height with the jewel coming up like that to give it a lovely profile.

Again, we're going to repeat that what we did on the other side. Easy Step By Step Hairstyles For Medium Length Hair This is the last section of hair, split that into two, same repeat the process again, just gently back comb half way up right to the bottom. That's it. Not too much now because we're getting towards the front, we don't want it to have too much height on this front section here, just to give that a nice raised profile, pin. I'm always putting the pins up when you hold it with your two fingers
[read more..]

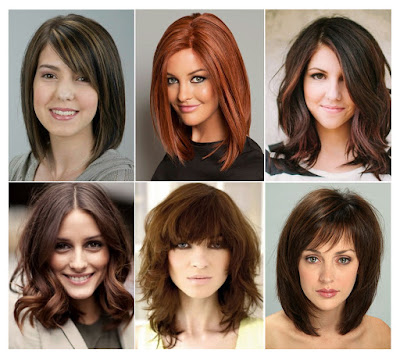
Pictures Medium Length Hairstyles For Women

Hi everyone. It's and today I'm gonna show you  Pictures Medium Length Hairstyles one of my favorite hairstyles the messy bun and if you guys don't know I cut my hair recently so doing the bun isn't so easy any more with shorter hair but let me tell you, you can still do it and its super easy and honestly it's a great way to hide a bad hair day. So let's get started. I like to start off with clean hair and I use the Suave Natural infusion Moisturizing Shampoo and Conditioner.

This is really great because it gives your hair moisture, it's smells really good and it doesn't weigh your hair down. So it's just kind of provide a nice base for you. Now to add some more moisture and kind of get rid frizz I like using a light oil spray like this one from Suave and sprays are really great because they don't get your hands dirty. So all you have to do is just spray a little bit in the ends of your hair, smooth it out and it's gonna protect your hair at extra shine and get rid of any frizziesthat you have.

Now from here to create the bond I'm just gonna grab all of my hair and pull it up as high as I can like this and a brush actually helps with this because this is gonna get rid of any bumps, it's also gonna help grab all of your hair cause my hair likes to sneak out cause it's shorter. Okay now I'm ready to secure everything now that my high pony is in place. So I'm just taking an elastic. My ponytail up here is nice and tight but as you can see this sneaky little chunkier doesn't want to stay up so what I'm going to do is I'm gonna move my pony out of theway.
Medium Length Hairstyles For Women
I'm gonna twist this bit up here up like this and then I'm gonna take a bobby pin and secure it in place.So that way it all stays up. Now it's time to get started on the bun so I'm gonna be using a little hair doughnut like this which makes me super happy because doughnuts are my favorite food and this is like a doughnut for your hair. So I am just gonna put this around at my pony tail like this and instead of rolling it like you normally would do with a suck bun or a doughnut bun as I like to call them I am just going to tease my hair.

So I have a brush and it's good for teasing a brush like this works best and you just kinda want to tease the crap out of it so it looks a little crazy. I kinda look like a palm tree right now and I kinda love it so to keep this look I'm gonna be using the TRESemme TRES Two Hairspray and this is going to provide some really nice hold. So I'm just gonna spray it all over like that. Then I am going to take my hair and kind of find where the little doughnut is and secure my hair and place with some more bobby pins.

And if you use bobby pins that are a little bit wider you won't get dents on your hair and with this you don't have to worry about being perfect because this is a messy bun and that's what I love about it. It doesn't need to look like you spend a ton of time on it because we're not spending a ton of time on it. So this pin any hairs that you see may fly away and it's really great because this pins will actually straight into the little doughnut and you can full pieces out if you wanted to be a little bit more even and that is the messy bun.

So this is the finish look and I really love it because it's messy and casual but you can still dress it up and I think it's just a really cool look to wear anytime. So if you guys want more easy hairstyles like this make sure you view more Pictures for Medium Length Hairstyles For Women.
[read more..]

Long Bob For Round Face Curly Wavy Frizzy Thin Hair

Haircuts and hairstyles Long Bob For Round Face today I'm going to give you some advice and what suits you best round faces, are usually wide and the lack angles people with round faces typically have small foreheads and jobs and their vertical and horizontal axes are the same length plus they have marked cheekbones cell if your face is round a boy tucking your here behind your ears this book at the optical illusion of a bigger faith sell it will suit you best if you leave you're here and tucked.

Any you park your here on one side another option it having site band but try to avoid a blunt banks because they're going to bring your face too much another thing that could situated, Along bob haircut the longer pizzas at the front full steel frame your faith but if you prefer longer here chest length here will still sick you it's fast if you weary its streak but if you want to give it some shape you can curl it but always from your shoulders down early area and it will give your here's some movement.

If you're here is naturally curly what I recommend living it a little bit longer that the girls will wait down if you wanna go for here do you just be sure to show your crime section some love by teaching it and adding a little bit of volume 28 this will look a lot better than tight ponytails or tight buying if you want to put your here in a binary in a ponytail it's much better if you leave some strength lose at the front any cover your ears cell lose ponies lose buns are going to look much nicer on you then titans.
Long Bob For Round Face
 If you have a round face site swept hair cells are going to look great on you it doesn't matter if its ponytail for breed wherein up to you just go for it because it will suit you for sure that's it for today, I blonde bob haircut since this here style is very trendy and claudia is here has grown quite a bit she's going to show you how to cut a long bar you want to start off by washing your hair in the candle in it really well part you're here as usual and put it in a low ponytail make sure it's tight entire with an elastic.

Flight your LASIK down a little bit and now take another elastic in this one will be your guidelines so make sure that you slide it down as much as you want so that you will achieve the here playing of your choice slide your fingers behind your ears to listen those sections a little bit and now it's time to cut you wouldn't do this little by little take your time and make your line as straight as possible but don't worry if you mess it up
because you can always do some touch ups later release your hair from the last eight.

Bring your here to the front and park you're here in the middle and now it's time for the touch ups, smooth your hair down and use your fingers that the guy to cut a diagonal line smooth your hair use your fingers that the guy an patenting country are here use your fingers and even an old you wanna keep on doing bid until you're here works even if you want to play here's what you need to do is come you're here away from your face and use your fingers to cut a vertical line it.

In May opinion for Long Bob For Round Face Curly Wavy Frizzy Thin Hair this haircut looks better without layers but that's just up to you me now you wanna blow dryer here and the next step really makes a difference take your scissors in flight then didn by doing this, you make sure that your line won't be as harsh it and that's it you're done I really like the long bob because I think that red hair cut are meeting for summer and they look very flirty and feminine.

[read more..]

Womens Medium Layered Hairstyles 2016 For Big Noses

If you're hard pressed to find the right hairstyle rest assured there are many styles that flatter your attributes and offer balance to your features Hairstyles For Big Noses can be equally as hip and stylish as the rest and you can either choose to emphasize your noses shave or select a cut that flatters it and helps to balance it with the other features on your face flattering styles once you've got the list of what to avoid it's time to move into hairstyle ideas that will flatter your features hairstyle magazines are a great place to find inspiration keep in mind that the following tips will help balance a large nose.

Layers hairstyle will add softness to your features while creating visual interest that distracts the eye from focusing on a prominent nose Jennifer Aniston's hairstyles are usually layered and soft leather wavy or straight and take the emphasis off of her nose soft waves and curls waves and curls widen the face which in turn shrinks the nose said hair in rollers or opt for a loose term to create visual softness bankruptcy self conscience waves color unique and edgy hair color makes your style rather than your nose the focus find a colorist who has some great ideas to make your hairstyle without breaking up the soft cut land.

Generally medium to long hair works best on women with large noses a longer style also allows you the freedom to play with rollers and up two styles which will add volume elsewhere when you need it bangs side swept bangs will take some of the attention off of the nose and soften the facial features overall blunt bangs however could draw more attention to the nose lea michele is a good example of how side swept bangs can flatter someone with a prominent nose if you love your nose and want to showcase your profile you can always choose a pixie cut it works well for Liza Minnelli side parts in or take some of the emphasis of a large nose part your hair to one side.
Hairstyles For Big Noses
A center part draws the eye vertically putting the news front and center this works regardless of the hairs length and even a very slight shift in the positioning of the part can make a difference PublishedWill be awesome if we all had an amazing little Kate Moss knows but the good news is with here economy styles you can completely change a lot with you people complaining about their nose but it's too wide too big for kid you name it the good news is just changing the placement of your hairstyle can change the whole look up your house let's see a little tiny baby knows learn all those you create the illusion Elaine that can be done keen here on your forehead a center down apart look awesome.

Anya retaining those people do up with a straight line Bay it close you face down some people have long noses if this is you want to create the illusion have a shorter knows the key here is not to draw attention to it so avoid a senator hart or lot of time on the top of your head this will make your nose look even longer with you and your mom knows need to do is create wit within your face this can be done by moving here away from your face in creating more volume within the sides of your hair so some people are born with required nose along the way hook no if this is you your job is easy.

Straight NAIA the worst thing you do when you're here is to make it hurt Upper Big Bopper only draw attention to help you get your noses you hear messy full line with the side Parker an asymmetrical cut look good on you because it'll draw attention away from the crooked nose noses come in all shapes and sizes and some people even have a prominent bigger does if this is you the goal here is to soften the bigger features you this soften your nose good for your hair towards your face lead always be based training you want to avoid 19 haircuts like the plague this will do nothing for your face you'll also want to avoid sweet your hair away from her face to you remember trying to soften that big beautiful nose into yours texture and bring you here forward with lots of movement that is what you need.

Womens Medium Layered Hairstyles 2016 For Big Noses The last seven years we get bigger is a wide are flat nose lot nosers now if you want a flat mostly create the illusion Lake you can do that by simply slapping a center middle are this will not only delaying bill also aaron is well up wit decide car trust us it's not gonna look good you need Center hurt her moving away from your face to the best compliment your nice some other give it to little nose or broken nose this is a you better and you can follow when choosing their next haircut and style give us a donde if you enjoyed the video we're always looking for new ideas that we have any holler to girls.
[read more..]

Beautiful Simple Hairstyles For School Step By Step

A lot of you are actually starting school so in this  like switching it up. And the best part about them is that they're Beautiful Simple Hairstyles to do, Actually so you won't lose sleep or anything, which is the most important thing to take away from this video. Now speaking of sleep, I just wanna say that when I have to wake up early in the morning heatless curls and heatless waves are like my best friend. Because not only do I get to sleep in, but when I wake up in the morning all I have to do is just take my little rollers out or pin curlers or whatever technique I used that night, and my hair is basically already done.

All I have to do is just fluff it out and style it a little bit and then I'm out the door. Okay so now for the first hairstyle, This one is so easy it takes less than five minutes to do perfect for if you're running late starting with the hair that frames the face, grab a section of hair, I don't know a couple inches wide, up to you, on both sides, the right side and the left side. You wanna pull backwards as a test to make sure that you like how these look backwards. After you've made your selection on the chunk of hair and the size, then go ahead and take those two chunks of hair from both sides, twist and then pull back.

Once you pull back all you're gonna do is take those two straight chunks of hair, and you're going to bring them together loop it and gently pull like so. And then afterwards you're gonna wanna loop one more time and then gently pull like so. Until you have this little knot and kind of pull the knot out a little bit this way you have like an open knot. And you will have these excess little strands of hair you can just go ahead and tuck them into the chunks of hair that you pulled to the side. Depending on how slippery your hair is bobby pins are optional. If you use a lot of hairspray like I did in this video you might not need it, Another way to do this look is when you get it into your knot instead of tucking the excess leftover hair away you can wrap the excess hair around the knot creating more of a circle shape, rather than like a little twisty look It's your choice.
Simple Hairstyles For School
Secure that one with a bobby pin and then you're ready to go super easy right, This next hairstyle you can wear when your hair is clean, dirty anything. It's this messy updo and it's so easy to style all you want to do is start off with a braid. You can do a regular braid or a French braid for the video I'm just gonna do a French braid to begin with because I just like how it looks and I'm pretty quick at it. I just start the braid at the top of my head, and then with each section I bring over I just grab more chunks of hair from the back and from the hair that frames my face.

And I just keep adding more sections into the braid until I get to about the top of my ear my little elf ears, right there. Afterwards just finish off the braid to the very end and then you can secure it with like a bobby pin or whatever to hold you over, because then you're gonna move on to the other side. And on the other side I'm just going to do a regular braid. I'm not gonna French braid it just because I have i feel like I don't have as much hair on that side or something. I don't know so I'm just going to do like a regular braid on this side And that'll work too and then put that off to the side as well.

Then take the first braid, and you want to pull it all the way back around your head you know as far as it can go, bobby pin once or twice, preferably twice to make sure it's secure. Now you have this part that you can stick your fingers through a little opening we're gonna use that right now, All you wanna do is take the hair that's lying down and pull it up and loop it into the braid. That's why you wanna make sure your braid is you know secured tightly, Because if it's not then it'll just like come out with the updo and you don't want that. Now for a more messy look leave the you know maybe a few inches of the hair still hanging out if you want more of a clean look tuck all of the hair in it's up to you, I personally like messy hairstyles.

So I'm gonna go ahead and leave the ends out a little bit kinda dangling there and then just move on to the next little chunk of hair and then do the same thing pull it up and tuck it in, Move to the next section pull it up tuck it in and you can just keep kind of arranging it however you like but for the most part this process moves very quickly once you have all of the hair tucked in just take the second braid on the other side of your head and wrap it around the updo like so on top of it and then pin it in. So you have your updo and what you want to do just the final step this is optional but I recommend  because it cool.

Is you just want to take and pull your braids to kinda loosen them it'll just give it like a big bubbly look if you will and once you're finished, it will look like something  this it wouldn't look exactly like this cuz every time you do it looks different but yeah I like it, It's cute. I hope Beautiful Simple Hairstyles For School Step By Stepthat you guys like it too Next hairstyle, one of my favorite kind of ponytails it just kind of turns a standard ponytail into a big long high fluffy ponytail that just looks super cute.
[read more..]